Battlefield 2042
for PC
Accessibility Resources

Display
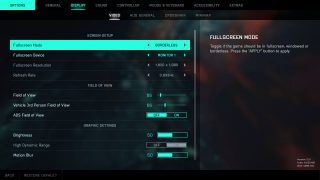
Fullscreen Mode
Select an option to choose a screen mode. This option includes Fullscreen, Windowed, or Borderless. Press the “APPLY'' button to apply. The default is set to Borderless.
Fullscreen Device
Choose which monitor to use for fullscreen. Press the “APPLY” button to apply.
Full Screen Resolution
Select an option to choose a resolution. This option varies by device. Press the “APPLY” button to apply.
Refresh Rate
Select the refresh rate of your display. This option varies by device. This setting might not have an effect if GSync, Freesync or other Variable Refresh Rate technologies are enabled.
Field Of View
Adjust the slider to set the Vertical Field of View. This option has a value range of 50 to 105. The default is set to 55.
Vehicle 3rd Person Field of View
Adjust the slider to set the Vertical Field of View for the chase camera. This option has a value range of 50 to 105. The default is set to 55.
ADS Field of View
Turn On/Off to enable or disable the relativity of FOV. When On, magnification of weapon sights will be relative to the user defined FOV, when Off, will be relative to the default of FOV. The default is set to Off.
Brightness
Adjust the slider to change the in game brightness settings. This option has a value range of 0 to 100. The default is set to 50.
High Dynamic Range
Turn ON/OFF to enable or disable High Dynamic Range (HDR).
Motion Blur
Adjust the slider to change the amount of motion blur. This option has a value range of 0 to 100. The default is set to 50.
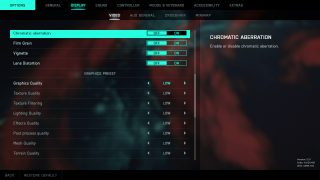
Chromatic Aberration
Turn On/Off to enable or disable chromatic aberration. The default is set to On.
Film Grain
Turn On/Off to enable or disable Film Grain. The default is set to On.
Vignette
Turn On/Off to enable or disable Vignette. The default is set to On.
Lens Distortion
Turn On/Off to enable or disable Lens Distortion. The default is set to On.
Graphics Quality
Select an option to change the graphics preset. This option includes Low, Medium, High, Ultra, and Custom. The default is set to Auto. Select custom for individual settings. Some settings require game restart to apply.
Texture Quality
Select an option to set the quality of textures. This option includes Low, Medium, High, Ultra, and Custom. The default is set to Auto. A higher setting may reduce performance.
Texture Filtering
Select an option to choose the level of anisotropic texture filtering: higher values result in sharper, more detailed textures. This option includes Low, Medium, High, Ultra, and Custom. The default is set to Auto. This setting requires game restart to apply.
Lighting Quality
Select an option to choose the quality and detail of light and shadows. This option includes Low, Medium, High, Ultra, and Custom. The default is set to Auto.
Effects Quality
Select an option to set the quality of effects. This option includes Low, Medium, High, Ultra, and Custom. The default is set to Auto. A higher setting may reduce performance.
Post Process Quality
Select an option to choose the quality and detail of post processing effects. This option includes Low, Medium, High, Ultra, and Custom. The default is set to Auto.
Mesh Quality
Select an option to set the quality of meshes. This option includes Low, Medium, High, Ultra, and Custom. The default is set to Auto.
Terrain Quality
Select an option to set the quality of terrain. This option includes Low, Medium, High, Ultra, and Custom. The default is set to Auto. A higher setting may reduce performance.

Undergrowth Quality
Select an option to set the quality of terrain decoration. This option includes Low, Medium, High, Ultra, and Custom. The default is set to Auto. A higher setting may reduce performance.
Antialiasing Post-Processing
Select an option to set the quality of post-processing. This option includes Low, Medium, High, Ultra, and Custom. The default is set to Auto. A higher setting may reduce performance.
Ambient Occlusion
Select an option to choose the dynamic ambient occlusion method. This option includes HBAO, HBAO Full, SSAO, and OFF. The default is set to HBAO. HBAO offers the highest quality, but comes at the highest performance cost.
Dynamic Resolution Scale
Turn On/Off to enable or disable dynamic resolution scale will deliver a more consistent frame rate at the cost of resolution. The default is set to Off.
Dynamic Resolution Scale Refresh Rate Target
Select an option to choose a refresh rate target for dynamic resolution scale. This option includes 25%, 50%, and 100%. The default is set to 100%.
DLSS
NVIDIA DLSS uses AI Super Resolution to provide the highest possible frame rates at maximum graphics settings. DLSS requires an NVIDIA RTX graphics card. Not compatible with DRS. The default is set to Off.
Ray Traced Ambient Occlusion
Turn On/Off to enable or disable Ray Traced Ambient Occlusion. Switching On will override any previous ambient occlusion settings. The default is set to Off.
NVIDIA Reflex Low Latency
Select an option to determine the NVIDIA Reflex system latency. NVIDIA Refelx is used to reduce system latency which increases PC responsiveness. This option includes Enabled, Enabled + Boost, and Disabled. The default is set to Enabled.
Latency Flash Indicator
Turn On/Off to enable or disable the Latency Flash Indicator. This creates a small white box at the middle left edge of the screen to indicate the first frame of action after the mouse has been pressed. Useful for accurate measurements when using NVIDIA Reflex Latency Analyzer and NVIDIA LDAT. The default is set to Off.
Future Frame Rendering
Turn On/Off to enable or disable Future Frame Rendering. When set to on, the game will buffer future frames, increasing visual smoothness but increasing input lag. When set to off, the game will respond more quickly to input but visual performance may be degraded. The default is set to On.
Vertical Sync
Turn On/Off to lock the gram rate to the refresh rate of the full screen display. This setting might not have an effect if Gsync, Freesync or other Variable Refresh Rate technologies are enabled. The default is set to On.
High Fidelity Objects Amount
Select an option to increase or reduce the amount of soldier and vehicles that can simultaneously be seen with highest fidelity animations, sounds, and effects. This option includes Low, Medium, High, and Ultra. The default is set to Medium. A high setting ensures a more consistent experience but may impact performance.
HUD General
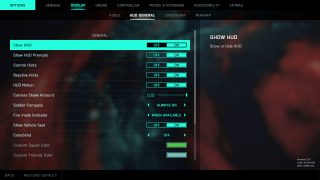
Show HUD
Turn On/Off to show or hide the HUD. The default is set to On.
Show HUD Prompts
Turn On/Off to enable or disable button prompts in the HUD. The default is set to On.
Control Hints
Turn On/Off to enable or disable control hints visible on the right side of the HUD. The default is set to On.
Reactive Hints
Turn On/Off to enable or disable reactive hints visible under the crosshair such as the reload hint. The default is set to On.
HUD Motion
Turn On/Off to enable or disable the HUD physics movement. The default is set to On.
Camera Shake Amount
Adjust the slider to change the strength of the camera shakes caused by explosions, etc. This option has a value range of 50 to 100. The default is set to 100.
Soldier Compass
Select an option to choose whether the soldier compass is visible only when aiming down the sight, always visible or disabled. The default is set to Always On.
Fire Mode Indicator
Select an option to choose whether the fire mode indicator is visible when it is possible to change firemode, always visible or visible only when aiming down the sight. The default is set to When Available.
Show Vehicle Seat
Turn On/Off to enable or disable the visibility for vehicle seats in the HUD. The default is set to On.
Colorblind
Select an option to change the HUD colors for Team, Squad, Enemy and Neutral. This option includes Off, Deuteranopia, Tritanopia, Protanopia, and Custom. The default is set to Off.
Custom Squad Color
Select an option to change the HUD color for squad icons.
Custom Friendly Color
Select an option to change the HUD colors for friendly icons.
Custom Neutral Color
Select an option to change the HUD color for neutral icons.
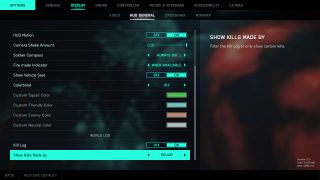
Kill Log
Turn On/Off to choose to show the kill log. The default is set to on.
Show Kills Made By
Select an option to decide how the Kill Log will filter certain kills. This option includes
Squad, Self, Nearby, All, and Team. The default is set to Squad.
Crosshair
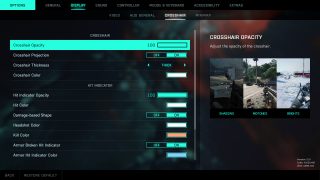
Crosshair Opacity
Adjust the slider to change the opacity of the crosshair. This option has a value range of 0 to 100. The default is set to 100.
Crosshair Projection
Turn On/Off to enable or disable the crosshair projection. When enabled, the crosshair is projected and can lessen the feeling of motion sickness caused by certain camera motions by keeping the crosshair focussed on where the player is aiming at the world. When disabled, the crosshair is static and always aligned with the center of the screen. The default is set to On.
Crosshair Thickness
Select an option to adjust the crosshair thickness. This option includes Default, Thick, and Thin. The default is set to Default.
Crosshair Color
Select an option to adjust the color of the crosshair.
Hit Indicator Opacity
Adjust the slider to change the visibility of the Hit Indicator. This option has a value range of 0 to 100. The default is set to 100.
Hit Color
Select an option to adjust the color of the Hit Indicator.
Damage-Based Shape
Turn On/Off to choose whether the Hit Indicator changes shape and size based on damage type. The default is set to On.
Headshot Color
Select an option to set the color for the Headshot Indicator.
Kill Color
Select an option to set the color for the Kill Indicator.
Armor Broken Hit Indicator
Turn On/Off to choose to show or hide the Armor Broken Hit Indicator when breaking a soldier’s armor. The default is set to On.
Armor Hit Indicator Color
Select an option to set the color for the Armor Indicator.
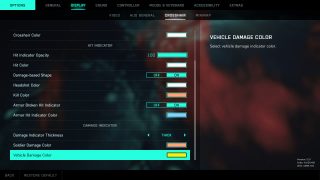
Damage Indicator Thickness
Select an option to adjust the Damage Indicator thickness. This option includes Thin, Medium, and Thick. The default is set to Thick.
Soldier Damage Color
Select an option to choose the Soldier Damage Indicator Color.
Vehicle Damage Color
Select an option to choose the Vehicle Damage Indicator Color.
Mini Map
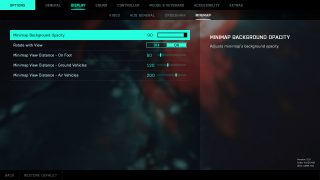
Minimap Background Opacity
Adjust the slider to change the minimap’s background opacity. This option has a value range of 0 to 100. The default is set to 90.
Rotate with View
Turn On/Off to decide whether the minimap will rotate with the player’s view or keep rotation fixed. The default is set to On.
Minimap View Distance- On Foot
Adjust the slider to increase or decrease the zoom effect of the minimap. Increase the Minimap View Distance value to zoom out and see a larger area of the map on the Minimap when on foot. Decrease the value to zoom in and see a smaller area. This option has a value range of 25 to 300. The default is set to 50.
Minimap View Distance- Ground Vehicles
Adjust the slider to increase or decrease the zoom effect of the minimap. Increase the Minimap View Distance value to zoom out and see a larger area of the map on the Minimap when using ground vehicles. Decrease the value to zoom in and see a smaller area. This option has a value range of 25 to 300. The default is set to 120.
Minimap View Distance- Air Vehicles
Adjust the slider to increase or decrease the zoom effect of the minimap. Increase the Minimap View Distance value to zoom out and see a larger area of the map on the Minimap when in an aircraft. Decrease the value to zoom in and see a smaller area. This option has a value range of 25 to 300. The default is set to 200.